Pages

Saturday, January 29, 2011

Magazines...Not Just for Reading Anymore!

As much as I hate to admit it, there just isn't a digital solution to thumbing through a favorite magazine.  Even I love to look at the beautiful photography and hold the bound pages in my hand.  But more paper and more trees leads me to wonder how to be part of the solution instead of the problem.  I have used the magazines and newspapers in my home to make some beautiful jewelry for my Etsy Shop and this fun tray:


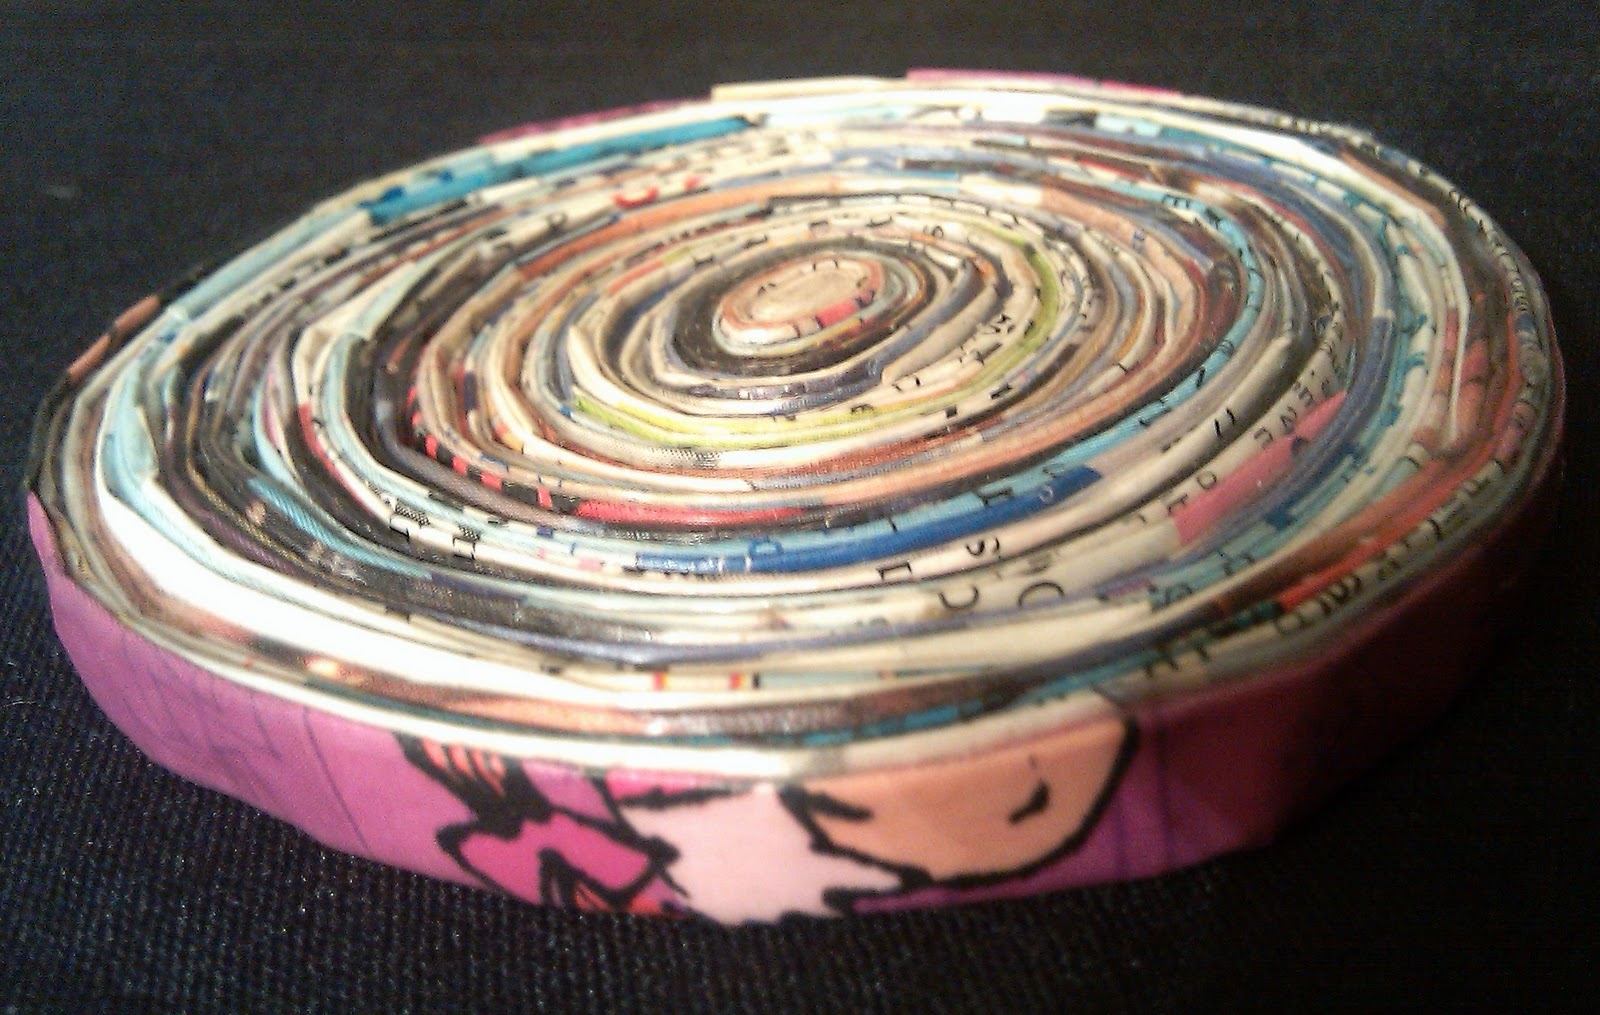
For today's blog I thought I'd show you how to upcycle some of those magazines that are piling up around your home to make this fun and eco-friendly coaster:


Just a word of caution; my first coaster took me three hours to make so allow yourself some time to make these.  This is a great project to do while your watching television.  Before you get started, here's what you'll need:


1.  A couple of magazines
2.  Something to cut the pages with - scissors are okay but if you have one available to you, I highly recommend a paper cutter.
3.  Glue stick
4.  Liquid glue (I used Tacky brand glue)
5.  Mod Podge


First, you'll want to prepare the strips for coiling.  Cut your magazine pages into one inch strips.

Then take a strip and fold it in half the long way.


Unfold the strip and use the fold line as a guide to fold in each side to the center.  You'll want to take caution not to allow the edges to overlap.

Run your glue stick along the folded strip, 

and refold along the first fold that you made.  Repeat until you have MANY skinny strips made!  It takes more strips than you can imagine.

Now it's time to start putting your coaster together.  Take your first strip and run a small (emphasis on small) amount of liquid glue along the strip and start to coil it.

Continue adding (and adding...and adding) strips being careful to line up the end of one strip with the start of the next.  Other artists prefer to overlap the edges of each strip but for this project I do not recommend doing so.  This tends to add gaps to your work, not a desirable trait in a coaster!

Once you have your coaster the size you want it coat the entire thing (one side at a time) with a layer of mod podge.  Add two more layers, more if needed.  Once the coaster is completely cured (approximately 24 hours) it's ready for use. At this point I chose to add a couple coats of a spray varnish.  It just felt like a stronger piece to me but it is not necessary.


There it is, ready to use!  Now repeat this process until you have a full, eco-friendly set of coasters.  Enjoy!

Monday, January 24, 2011

I am an Etsy for Animals Artist

Okay, even I have to giggle a little when I call myself an artist.  It's not one of those careers that ever made it to my What Do You Wanna Be When You Grow Up? list mostly because I just didn't consider myself very artistic.  As it so happens, I am and Etsy for Animals (EFA) artist and I find it just as rewarding as working with animals.

EFA is an amazing group of artisans who peddle their wares for a cause - an animal related cause.  Each charity is self selected and just as varied as the artists themselves.  For example, I have a long history of working with primates, chimpanzees especially.  So every time I make a sale in my Etsy shop I donate 10% to the Jane Goodall Institute to help them continue their efforts in protecting habitat, rescuing orphaned chimps and other conservation efforts.  You'll find plenty of other organizations supported by EFA artists who help every kind of animal  from cats and dogs to llamas and tapirs.

To see other artists who are supporting animal causes that are meaningful to them check out the list in my blog sidebar (to the left).  This certainly isn't a complete list but it's a good place to start. Happy shopping!

Tuesday, January 18, 2011

Plastic Plastic Everywhere!

The very first true plastic, Bakelite, arrived on the scene over a hundred years ago and today it is everywhere!  It brings amazing benefits to our daily lives but at a high environmental cost.  While some plastics are recyclable, others are not.  So, in today's post we'll look at some alternative uses for the plastics that we consume on a daily basis.  While you are reading, be sure to keep in mind the verse Reduce, Reuse, Recycle.  All to often, we head straight to the Recycle part and forget about the Reduce and Reuse part.  While recycling is a great alternative to the trash can it also has some economic and environmental costs associated with it.  Here are some ways that I reuse the plastics in my life and hope that you'll post other great ideas below.


In the opening photo, I've chosen some plastics that are not recyclable in my community.  We are a little behind the times with plastics #1 and #2 being the only types of plastic accepted at our local facility.  I have stacks of plastic food containers (typically #5) that I use for a variety purposes.  Once they have been cleaned they are ready to store leftovers, craft supplies and much more.  Most of these smooth plastics can even be written on with a dry erase marker to label whatever is stored inside.  And when you're ready to store something else just wipe it clean and relabel it.

Pill bottles make great storage for little items.  For the jewelry that I sell in my Etsy shop I make beads out of newspaper, magazines and plastic bags and I store them in these pill containers until I am ready to use them.  While I lack the patience and talent for it, some artists make beautiful art with them. Here are some beautifully beaded pill bottles. As with all of your reused plastic containers, you'll want to be sure to wash out those bottles very well.


Another really great bead (or any number of small items) storing container is this one. It had Ferrero Rocher chocolates in it and I've used the containers both with and without the insert.  The one shown has the insert and is used to group similar beads that I want to keep together.

 How is this for a fun, messy and upcycled kids craft?  My niece and I  worked on some papier mache projects together.  We obviously used newspaper and balloons for the form.  But she's a little older and we wanted to add a little sophistication.  To accomplish this we added a base to each piece.  For the small ones we used milk and soda caps and for the larger pieces of art we used the bottom of Starbucks cups.  Add a little papier mache over the plastic pieces and viola - upcycled decorative bowls that stand upright!

 My passion for "doing right by the earth" surely stems from my love of animals.  Anyone who visits my home can make no bones about that statement when they are greeted by 5 cats, a dog, a bird and a tortoise (all rescues)!  You can only imagine the kitty litter that I go through with 5 cats.  I buy one 35 pound container EVERY week!  I can never bring myself to get rid of those amazing containers and have found so many uses for them. I use them for everything from christmas cords and decorations storage to collecting garden scraps whilst pruning and weeding.


They make pretty awesome recycling containers as well.  Check out this recycling container with swagger in my Etsy shop.  I have a feeling there are more where that one came from!


Please post you're ideas for reusing or upcycling your plastic below!

Starbucks Blonde

Sunday, January 9, 2011

Introduction

Welcome to Upcycled Stuff's new blog!  This will accompany our Facebook fan page to help you live a greener life.  We'll give you simple tips that you can incorporate into your daily life and we'll even give you some more complex and fun ideas. I hope you enjoy the blog!
Related Posts Plugin for WordPress, Blogger...